This is an advance process that allows us to prepare a cluster node or likely multiple nodes quickly. We will use the configuration file feature and install the SQL services and instance level resources on each node so they are exactly the same. Then we fail all of the drives to one node and perform one installation to “Complete” the cluster.
The time saver is that you can use the same config file on 3,4 or more nodes to “prepare” all of the instances that the cluster is supporting. Also, with a configuration file created we can perform an unattended installation and potentially automate part or all of the process. Think Powershell.
For the purpose of this example we will be using:
- Cluster Virtual Name: MySQLCluster01
- Resource: SQL310
- Resource: SQL320
- Resource: SQL330
- 3 Nodes: Myserver01, Myserver02, Myserver03
Install SQL Cluster Prerequisites
This process is advanced and there are many prep steps, you should have some understanding on how to install a cluster already. You should be familiar with installing a SQL server failover cluster using the wizard per Microsoft’s website before attempting an Advanced process.
You should also be familiar with performing an unattended install, which is basically using the configuration file and the command line only.
The wizard will ask you questions and check for issues as you go, you should be familiar with how to troubleshoot and handle them. Once we create the config file we will not be using the wizard anymore to perform the installation.
The Server Administrator should provide the following per your company policy:
- Windows Failover Cluster
- Cluster and Instance Virtual Names
- Assigned IP addresses for all Virtual Objects
- Failover Has Been Tested for all Nodes
Failover Cluster Manager – Nodes
It’s a good practice to ping all of the virtual names and verify their IP addresses as well as testing the Fail over capabilities. Test the fail over for each clustered Role you will be installing an instance too.
The Roles do not need to be on the same node while you perform the Preparation. This step is only for installing the SQL services that the cluster will be failing over to.
In this example we are using the Myserver01 node to perform the first prepare installation.
SQL Advanced Cluster Preparation – SQL
Choose a server/node to run the setup.exe on first (MyServer01).
We will need to execute the installation on each node later but we don’t need to walk through the Wizard one time to generate the configuration file.
Run Setup.exe
You may or may not have realized there is an Advanced menu item on the installer. Under this menu we will be preparing each node for the SQL instance(s) on the cluster.
We will walk through the wizard install so it creates a new Configuration File for us.

Click the “Advanced Cluster Preparation” to start the wizard and Click through the initial items such as:
- Microsoft Product Updates
- Product Key
- License Terms
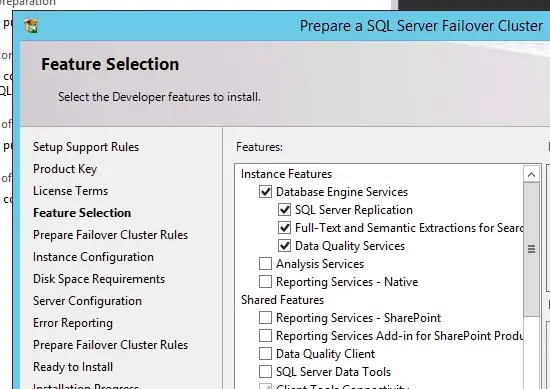
- Feature Selection (First Install will need shared features)
- Instance Configuration (SQL310)
Note: The instance Configuration screen shows any instances that have already been installed. Be sure the instance we are planning to install is not listed here.
- Server Configuration: Service Accounts and Passwords
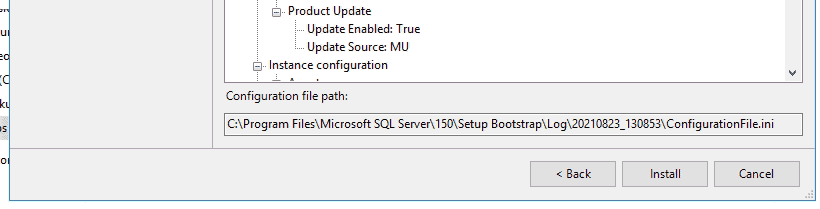
Click Next and you should end up at the Install screen where the summary is presented.
Prepare Configuration File
You will end up on the summary screen with the “Install” button at the bottom and a small text box displaying where the “ConfigurationFile.ini” file is located. Browse to this folder and copy the “ConfigurationFile.ini” to another location such as a “D:\SQL_Install”.
We will have 2 files eventually for each instance (6 total), a preparation and completion. Since this file is the “Preparation”, rename it so we keep track of what were installing. Then copy the file 2 more times for the other SQL instances.
 ConfigurationFile_Prepare_310.ini
 ConfigurationFile_Prepare_320.ini
 ConfigurationFile_Prepare_330.ini
Take note that we have not configured any role settings for the cluster yet. The preparation step installs the SQL service on each node for each SQL instance.
At this last step you can simply click Install to setup the first “Prepared Cluster Resource” or cancel it and use the “ConfigurationFile_Prepare_3xx.ini” to install Quietly later in these steps. The following is meant for all 3 files where the instance details will be changed in each file accordingly.
ConfigurationFile_prepare_3xx.ini Contents
Please open and review the contents of ConfigurationFile_Prepare_310.ini.
There are comments to help with each setting and you can visit the Microsoft website to get a detailed explanation on each entry in the SQL Configuration File. If you just review the settings (parameters) generated by the installer, most of them are pretty obvious.
We need to open each of the 3 files and update them, you should already recognize:
- ACTION=”PrepareFailoverCluster”
- SQLSVCACCOUNT=”DBT\SQLServiceLogin”
All of these parameters can also be set when executing the command line statement but I found it easier to include the install parameters in the .INI file. We will include parameters like the service password when we execute the command so the password is not stored here in plain text.
Unattended SQL Cluster Prepare
The configuration file contains the settings that are required to install the SQL Service but not everything. You can run Setup.exe using this config file and the wizard will be populated with the saved settings. We want to remove the wizard requirement so the process can be completed silently and without the overhead (time) required to walk through the wizard all 3 times on 3 different servers/nodes.
Quiet and QuietSimple
You will see both of these settings in the configuration file but we will leave them both set to False and handle it as a parameter in the command line. Using /Q and /QS.
QUIET="False"
QUIETSIMPLE="False"
This allows us to control whether the install is fully unattended or it can display the progress in the command window.
As with many things in IT there is a catch when using a GUI or command prompt. The setting UIMODE does not pair with the Quiet settings and must be commented out or you get errors in the summary.txt file.
Use the semi-colon to comment out UIMODE:
;UIMODE="Normal"Instance Information
As you look through the configuration you will see certain instance specific settings. These settings will be changed for each instance we are installing so make the change in all 3 files. Using our example the settings look like:
ConfigurationFile_Prepare_310.ini
INSTANCENAME="SQL310"

INSTANCEID="SQL310"

FTSVCACCOUNT="NT Service\MSSQLFDLauncher$SQL310"
ConfigurationFile_Prepare_320.ini
INSTANCENAME="SQL320"

INSTANCEID="SQL320"

FTSVCACCOUNT="NT Service\MSSQLFDLauncher$SQL320"ConfigurationFile_Prepare_330.ini
INSTANCENAME="SQL330"

INSTANCEID="SQL330"

FTSVCACCOUNT="NT Service\MSSQLFDLauncher$SQL330"
Another item to scrutinize is the Path or folders where SQL will be installed. Best practices will place the SQL service on a drive other than the C drive. In our example I am using the D:\ as each node has a C and D drive in my cluster. These were set when you went through the wizard so no change should be necessary.
INSTALLSHAREDDIR="D:\Program Files\Microsoft SQL Server"

INSTALLSHAREDWOWDIR="D:\Program Files (x86)\Microsoft SQL Server"

INSTANCEDIR="D:\Program Files\Microsoft SQL Server"
There is one parameter that is not in the config file at all, I believe by design. This is the License Terms Acceptance. The wizard provides a checkbox but does not include this in the Configuration File.
You will need to add this parameter to the File or add it to the command parameter later on. For my setup I am adding it to the File as such:
IAcceptSQLServerLicenseTerms="True"If you prefer to include it in the command later you can use it as a switch like this:
/IAcceptSQLServerLicenseTerms=TrueSQL Uninstall Using the Configuration File
Before attempting to run the installation quietly it would be good to have the ability to uninstall quietly as well. The action parameter also has an option for uninstalling too:
D:\SQL_Install\setup.exe Action=Uninstall /FEATURES=SQL /INSTANCENAME=SQL310 /Q

D:\SQL_Install\setup.exe Action=Uninstall /FEATURES=SQL /INSTANCENAME=SQL320 /Q

D:\SQL_Install\setup.exe Action=Uninstall /FEATURES=SQL /INSTANCENAME=SQL330 /Q
Cluster Completion Note: When running the “Cluster Completion” later, the installer will look for a prepared clustered instance before allowing you to continue, the preparation must be installed first.
Command Line & Summary.txt
At this point we have a “Prepare” configuration file ready to install SQL on all 3 of the nodes, MySQLCluster01, MySQLCluster02 and MySQLCluster03.
Open a command prompt window and execute the following 3 times, based on your drive and folder settings:
D:\SQL_Install\setup.exe /ConfigurationFile=F:\SQL_Install\ConfigurationFile_Prepare_SQL310.ini /SQLSVCPASSWORD="paswd1" /AGTSVCPASSWORD="passwd2" /Q

D:\SQL_Install\setup.exe /ConfigurationFile=F:\SQL_Install\ConfigurationFile_Prepare_SQL320.ini /SQLSVCPASSWORD="paswd1" /AGTSVCPASSWORD="passwd2" /Q

D:\SQL_Install\setup.exe /ConfigurationFile=F:\SQL_Install\ConfigurationFile_Prepare_SQL330.ini /SQLSVCPASSWORD="paswd1" /AGTSVCPASSWORD="passwd2" /Q
You will notice that the sa password is not included in this statement. Since we are only installing the SQL service we don’t need the sa password yet.
If anything fails you should get an error message pointing you to the Summary.txt file so you can review the errors. Also, you change the Quiet switch to /QS if you prefer to see the status as it installs.
The summary file default location is here:
C:\Program Files\Microsoft SQL Server\1xx\Setup Bootstrap\Log\Summary.txtPart 1 Conclusion
These steps got us as far as installing 3 SQL Services on our 3 cluster nodes in preparation for installing the SQL Instances on the cluster. In Part 2 we will run the Completion where the Virtual names, IP Addresses and Disk are assigned using a configuration File and we can perform this just once with all of the resources on one node.